
This is an old revision of the document!
Table of Contents
How to import addresses (promio.mail.complete)
Address data can be added to the promio.mail system using the target-group import. After a successful import, these address data are available in promio.mail as a target group.
Only upload addresses from which you have an “Opt-in”. This means that the owners of the addresses have actively and knowingly allowed you to store and use the address and further personal data to contact them! In the event of complaints, in cases of doubt, you must be able to prove where and when you obtained the address.
Preparation
Before address data can be imported into promio.mail, these must be stored as a csv or txt file in the FTP or SFTP folder of the current client (or alternatively the client which you logged into). The address data must be stored in the upload/manual (FTP) folder or the incoming/upload/manual (SFTP) folder.
To import addresses, you will need an FTP client with which you can securely load data to our server. Filezilla is an example of a free client with which you can upload data straightforwardly. The access data for the FTP folder of your client will have been made available to you as arranged by promio.net.
Import target group step 1
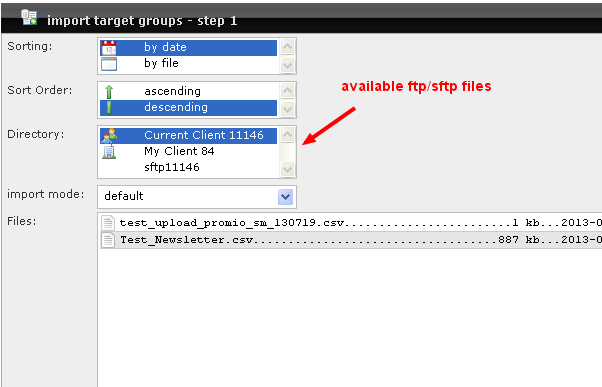
For the first step of the address import, the directory containing the address file to be imported must first be selected. The file list then displays all available files. The sorting and sort order of this list can be adapted. The file to be imported must be marked by clicking on it, and the selection must be confirmed by clicking on OK. The import mode is a default.
Import target group step 2
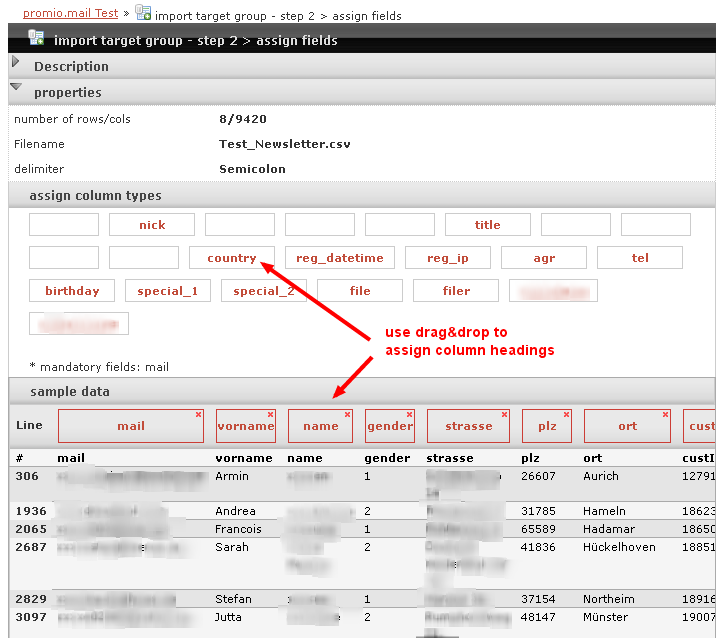
The properties of the selected address file can be viewed in the upper part of the view, e.g. the file name, the row-count and column-count, as well as the delimiters between the individual columns. In the lower part, the column types defined in promio.mail, as well as a sample of the address file can be seen.
For the second step of the address import, all columns of the address file to be imported must be assigned to the data fields available in promio.mail. In other words, it must be decided which column of the csv contains the first name, for example, which column contains the post code, or the location etc. Only by doing this can the information for a personalised address in a mailing, for example, be correctly obtained in promio.mail.
Assign the columns using drag & drop, by dragging the individual column types into the respective unlabelled column heading in the sample. promio.mail automatically recognises individual columns – please check the accuracy of columns which have already been assigned. If a column has been assigned wrongly, you can remove this by clicking on the red cross.
If all necessary columns have been assigned, the default settings can – if necessary – be further adapted under options. Here, settings such as the character set of the address file can be changed, and other optional settings can be made. Next, confirm the assigned columns and settings with OK.
The import process can take up to several minutes. The completion of the started job can be followed in the Job queue. After a successfully completed import, the imported address data are available as a target group in the target-group administration. This can be further edited or used for delivery.
Keep in mind that email addresses with a false syntax will automatically be filtered out during the import. Internal duplicates within a file are also recognised. In other words, depending on the setting of the unique attribute of the current client (default: email; alternative: custID) only the first record will be imported if the csv file contains the same email address (or the same custID) multiple times. Email addresses on the blacklist will also be filtered out automatically during import.
