This is an old revision of the document!
How is a target group assigned to an e-mail?
Assigning a target group to an e-mail in a campaign determines to which recipients the e-mail in question will be sent.
You can assign the target group in the campaign details. To do so, click on a creative in the list. In the box actions you can enter the relevant settings by clicking on Assign target group.
A drawer opens up with the following possible selections:

Filter and exclude filter are available for default, tracking and auto campaign.
| Target group | Select the target group to which the message is to be sent.
Here are also greyed out entries – these are static target groups which are already assigned to another creative draft. Therefore they are not available anymore. Write protected or auto target groups can be connection to more than one creative and are therefore black and clickable.
|
| Filter | If you want to select certain recipients within the chosen target group, you can use one or more previously created filters.
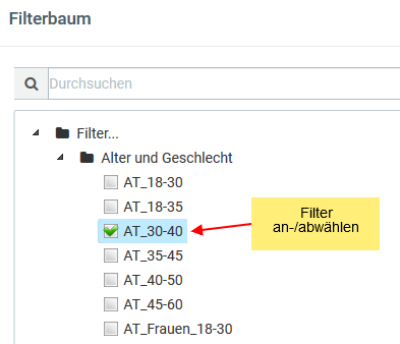
Add or remove filters via the plus(+) icon. A click on the icon opens the filter tree view and shows all filters that have been created in Addresses > Filter. Check and uncheck the checkboxes to select your filters and click OK: A click on the icon opens the filter tree view and shows all filters that have been created in Addresses > Filter. Check and uncheck the checkboxes to select your filters and click OK:

Filters chosen here are linked with an AND-connection, meaning that only users who meet all of the selected filter criteria will receive the message.
|
| Exclude filter | If you want to exclude specific users from your chosen target group, you can select one or more excluding filters.
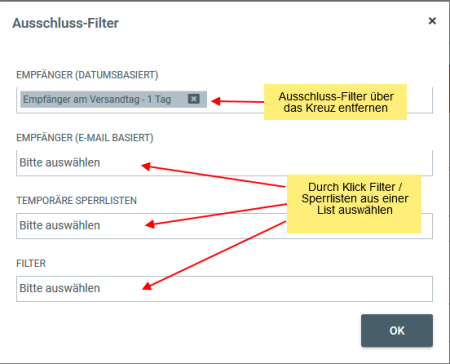
There are three different types of exclusion filters:
Recipients (date-based):: ): exclude – depending on the delivery day of your chosen e-mail - recipients of the same day, the previous day or two days ago. This filter allows you to regulate the number of e-mails each user receives per day.
Recipients (e-mail based): exclude recipients of a specific campaign from the current e-mail’s delivery.
Temporary blacklists: choose one or more previously defined blocklists. For example, a blocklist can be a temporary blacklist from an advertiser.
Filter: Choose ome or more already created filters

An exact manuel on how to create a temporary blacklist can be found in the article: „How do I use temporary blocking list?“
|
| Filter result | Calculate the current filtering result to see how many recipients would be receiving your e-mail if you started delivery right away.
By selecting an auto target group, filters and temporary blacklists the size of your target group varies constantly. Changes in size due to subscribes and unsubsibres or because of changes in the recipients‘ profiles will be taken into account.
|
| Limit | Specify a limit if you want to restrict the number of recipients. This may be necessary if - for example - an advertiser has booked a certain number of addresses from your list.
You can specify the method of limitation: Random selection of addresses, preferred selection of new addresses, or preferred selection of active addresses (click-/open rate). |
Example

Here, the target group would consist of users with all of the following characteristics:
The target group currently has 508 recipients and will be restricted to 200 recipients (active addresses preferred).


